

Handling Authentication and Authorization failures in API Server
Learn how to send custom response in case of authentication failure or authorization failure


In the previous article of this series, we created an API server using Spring Boot. We secured the API server to allow only authenticated requests to access the resources. But, in case of unauthenticated request, the server responds with an empty response, which is not helpful at all. So, in this article we will learn how to send custom response if the request is not authenticated or not authorized.
Create a Custom OAuth2 Authentication Entry Point
To handle unauthenticated requests, we need to implement commence method of AuthenticationEntryPoint interface. Create a file CustomOAuth2AuthenticationEntryPoint.java inside security package. Replace the code of this file with the following code:
package dev.hashnode.hpareek.OAuth2DemoResourceServer.security;

import com.fasterxml.jackson.databind.ObjectMapper;
import org.springframework.http.HttpStatus;
import org.springframework.security.core.AuthenticationException;
import org.springframework.security.web.AuthenticationEntryPoint;

import javax.servlet.ServletException;
import javax.servlet.http.HttpServletRequest;
import javax.servlet.http.HttpServletResponse;
import java.io.IOException;
import java.util.Date;
import java.util.HashMap;
import java.util.Map;

public class CustomOAuth2AuthenticationEntryPoint implements AuthenticationEntryPoint {

    private final ObjectMapper objectMapper = new ObjectMapper();

    @Override
    public void commence(
            HttpServletRequest request,
            HttpServletResponse response,
            AuthenticationException authException
    ) throws IOException, ServletException {
        HttpStatus httpStatus = HttpStatus.UNAUTHORIZED; // 401

        Map<String, Object> data = new HashMap<>();
        data.put("timestamp", new Date());
        data.put("code", httpStatus.value());
        data.put("status", httpStatus.name());
        data.put("message", authException.getMessage());

        response.setStatus(httpStatus.value());

        response.getOutputStream()
                .println(objectMapper.writeValueAsString(data));
    }
}
Here, we store some information related to authException in data. We set the status of the response to 401 or UNAUTHORIZED and respond with data. Now, we need to configure HttpSecurity to use this class for AuthenticationException. To do that, we modify the code of SecurityConfig.java file using the following code:
// Imports

@Configuration
public class SecurityConfig extends WebSecurityConfigurerAdapter {
    @Override
    protected void configure(HttpSecurity http) throws Exception {
        http.authorizeRequests()
                .anyRequest().authenticated()
                .and()
                .oauth2ResourceServer()
                .authenticationEntryPoint(authenticationEntryPoint())
                .jwt();
        http.cors();
    }

    @Bean
    public AuthenticationEntryPoint authenticationEntryPoint() {
        return new CustomOAuth2AuthenticationEntryPoint();
    }
}
Here we are creating a method authenticationEntryPoint to return a bean of AuthenticationEntryPoint interface. And this method returns an instance of CustomOAuth2AuthenticationEntryPoint class which we created in the previous step. Also, we are configuring HttpSecurity to use bean returned by authenticationEntryPoint method to handle AuthenticationException.
Create a Custom Access Denied Handler
AuthenticationException is thrown when the api request is not authenticated. And to handle this exception, we made some configuration in previous section. But, what if the request is authenticated, but it does not have access to use certain resources? In this case, AccessDeniedException is thrown and we need to handle it by implementing AccessDeniedHandler interface. Create a file CustomAccessDeniedHandler.java inside security package and replace the code of this file with the following code:
package dev.hashnode.hpareek.OAuth2DemoResourceServer.security;

import com.fasterxml.jackson.databind.ObjectMapper;
import org.springframework.http.HttpStatus;
import org.springframework.security.access.AccessDeniedException;
import org.springframework.security.web.access.AccessDeniedHandler;

import javax.servlet.ServletException;
import javax.servlet.http.HttpServletRequest;
import javax.servlet.http.HttpServletResponse;
import java.io.IOException;
import java.util.Date;
import java.util.HashMap;
import java.util.Map;

public class CustomAccessDeniedHandler implements AccessDeniedHandler {

    private ObjectMapper objectMapper = new ObjectMapper();

    @Override
    public void handle(
            HttpServletRequest request,
            HttpServletResponse response,
            AccessDeniedException accessDeniedException
    ) throws IOException, ServletException {
        accessDeniedException.printStackTrace();
        HttpStatus httpStatus = HttpStatus.FORBIDDEN; // 403

        Map<String, Object> data = new HashMap<>();
        data.put("timestamp", new Date());
        data.put("code", httpStatus.value());
        data.put("status", httpStatus.name());
        data.put("message", accessDeniedException.getMessage());

        response.setStatus(httpStatus.value());

        response.getOutputStream()
                .println(objectMapper.writeValueAsString(data));
    }
}
Here, just like AuthenticationEntryPoint, we are responding with custom response in case of AccessDeniedException. We are using 403 status code. Now, we need to configure HttpSecurity to use this class to handle AccessDeniedException. Update the code in SecurityConfig.java file according the following code:
// Imports...

@Configuration
public class SecurityConfig extends WebSecurityConfigurerAdapter {
    @Override
    protected void configure(HttpSecurity http) throws Exception {
        http.authorizeRequests()
                .anyRequest().authenticated()
                .and()
                .oauth2ResourceServer()
                .authenticationEntryPoint(authenticationEntryPoint())
                 .accessDeniedHandler(accessDeniedHandler())
                .jwt();
        http.cors();
    }

    // Rest of the code

    @Bean
    public AccessDeniedHandler accessDeniedHandler() {
        return new CustomAccessDeniedHandler();
    }
}
This is same as we did for AuthenticationEntryPoint.
Apply method level security
Let's assume that we want to allow access to /authors/all endpoint only to the users who have authors scope in access_token. All the information about access levels is stored in access_token. To accomplish this type of security, we use method level security. Annotate SecurityConfig class with EnableGlobalMethodSecurity annotation to enable method level security:
// Rest of the code

@Configuration
@EnableGlobalMethodSecurity(prePostEnabled = true)
public class SecurityConfig extends WebSecurityConfigurerAdapter {

    // Rest of the code

}
Annotate getAuthor method of AuthorController class with PreAuthorize annotation to add extra access level security:
// Rest of the code
public class AuthorController {

    @GetMapping("/all") // This method handles requests for /authors/all
    @PreAuthorize("hasAuthority('SCOPE_authors')")
    public List<String> getAuthor() {
        // Rest of the code
    }
}
The method getAuthor will get executed only if the request has authors scope, otherwise AccessDeniedException is thrown and is caught by our custom implementation of AccessDeniedHandler.
Create authors scope in Okta
Let's create authors scope in Okta. Go to Security > API. Click on name of authorization server. It will be default most probably. Switch to Scops tab. Click on Add Scop button. Enter the following information and click Create.
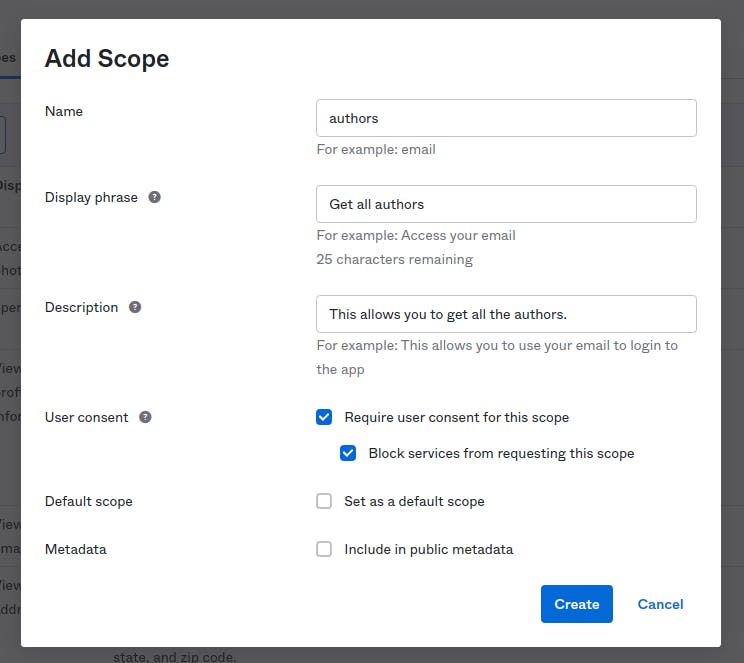 The authors scope has been created.
See everything in action
Run the angular application which we developed in first part of this series and enhanced in second part using ng serve command. And open http://localhost:4200 url in a private window. Without logging into the app click on Get Authors button. We see response similar to the following in the Network tab of developer tools:
{
  "code": 401,
  "message": "Full authentication is required to access this resource",
  "timestamp": 1638813968756,
  "status": "UNAUTHORIZED"
}
It is obvious since we are not authenticated. Now, log into the app by clicking on Login button. After successful login, click on Get Authors button. This time we get the following response:
{
  "code": 403,
  "message": "Access is denied",
  "timestamp": 1638814214423,
  "status": "FORBIDDEN"
}
This time, we are authenticated, but we do don't have authors scope associated with the access_token. So, we get Access Denied response. Now, change the scope field in authCodeFlowConfig.ts file in directory src/app/config as shown below:
// Rest of the code

export const authCodeFlowConfig: AuthConfig = {
  // Rest of the code
  scope: "openid profile email authors",
  showDebugInformation: true
};
Here, we want access to resources related to authors as well. Now, when user tries to login, she gets prompted to allow our app to have authors access. Re-run angular app and visite http://localhost:4200 in a private window. Click on Login button. We see a consent screen as below image:
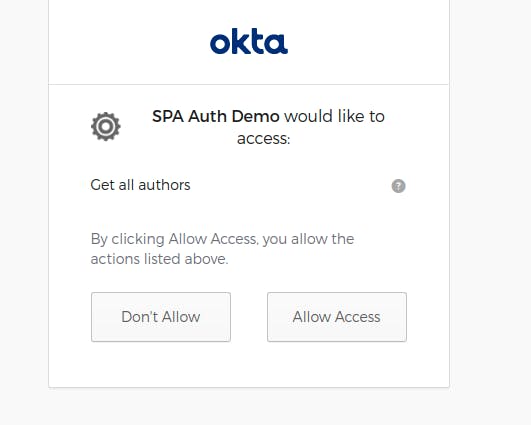 Click on Allow Access button. You are now logged in and the access token has
 authors scope. Click on Get Authors button. We see a response similar to this in Console or Network tab of Developer tools:
[
  "Author 1",
  "Author 2",
  "Author 3"
]
Wow. That's all.
Summary
Click here to get the source code of everything covered in this article. We learnt how to send custom response back to user in case of authentication or authorization failure. We also used some annotations to protect our methods. In next articles, I will try to explain some disadvantages and security concerns of using OAuth2 flow in Single Page Applications.
Until then. Stay safe and keep learning...