


Serving Angular App from Spring Boot Server for Secure 🔐 OAuth Flow - Part 2 ✌
Learn how to use the client-server as a proxy to make API requests from the angular app to the resource server


In the previous part of this series, we served an angular app from a Spring Boot server. We also used authentication on the server-side so that all the credentials and the access token are stored at a secure backend. The browser or Angular app does not have access to the access token. So, how do we make API requests to the Resource Server from the angular app which requires access tokens to be present in the request 🤔? Let's discuss it.
What you should have? 🛠
- Some familiarity with Angular and Spring Boot.
- A resource server is running on port
8080. If you followed the second part and the third part of the series, then run that server again. Otherwise, follow these steps:- Clone / download this repository.
- Go to
OAuth2DemoResourceServerdirectory. - Update
src/main/resources/application.propertiesfile with the correct values. - Run
./mvnw spring-boot:runcommand to start the server. The server should be running on port8080.
Spring Boot Server created in the previous part. I call it Client Server throughout the article. Or, follow the below steps:
- Clone / download this repository.
- Go to
oauth2clientserverdirectory. - Update
src/main/resources/application.propertiesfile with the correct values. - Run
./mvnw spring-boot:runcommand to start the server. In another terminal, run./ng build --watchto build the angular app whenever there is any change in related files.
You must have a scope named
authorsin your Identity Provider. I have already explained how to create scope in Okta in this article.
The server should run on port 8081. If we try to access http://localhost:8081 in a private browser window, we see a page for authentication. After successful authentication, we see a home page created using angular.
Don't be confused between Resource Server and Client-Server. Both are created using Spring Boot. The Resource Server is the one that holds all the resources and exposes some APIs to be consumed by other applications. The client Server is the one that renders the angular app after successful authentication.
The Idea 💡 - Access Token 🔑 & Cookie 🍪
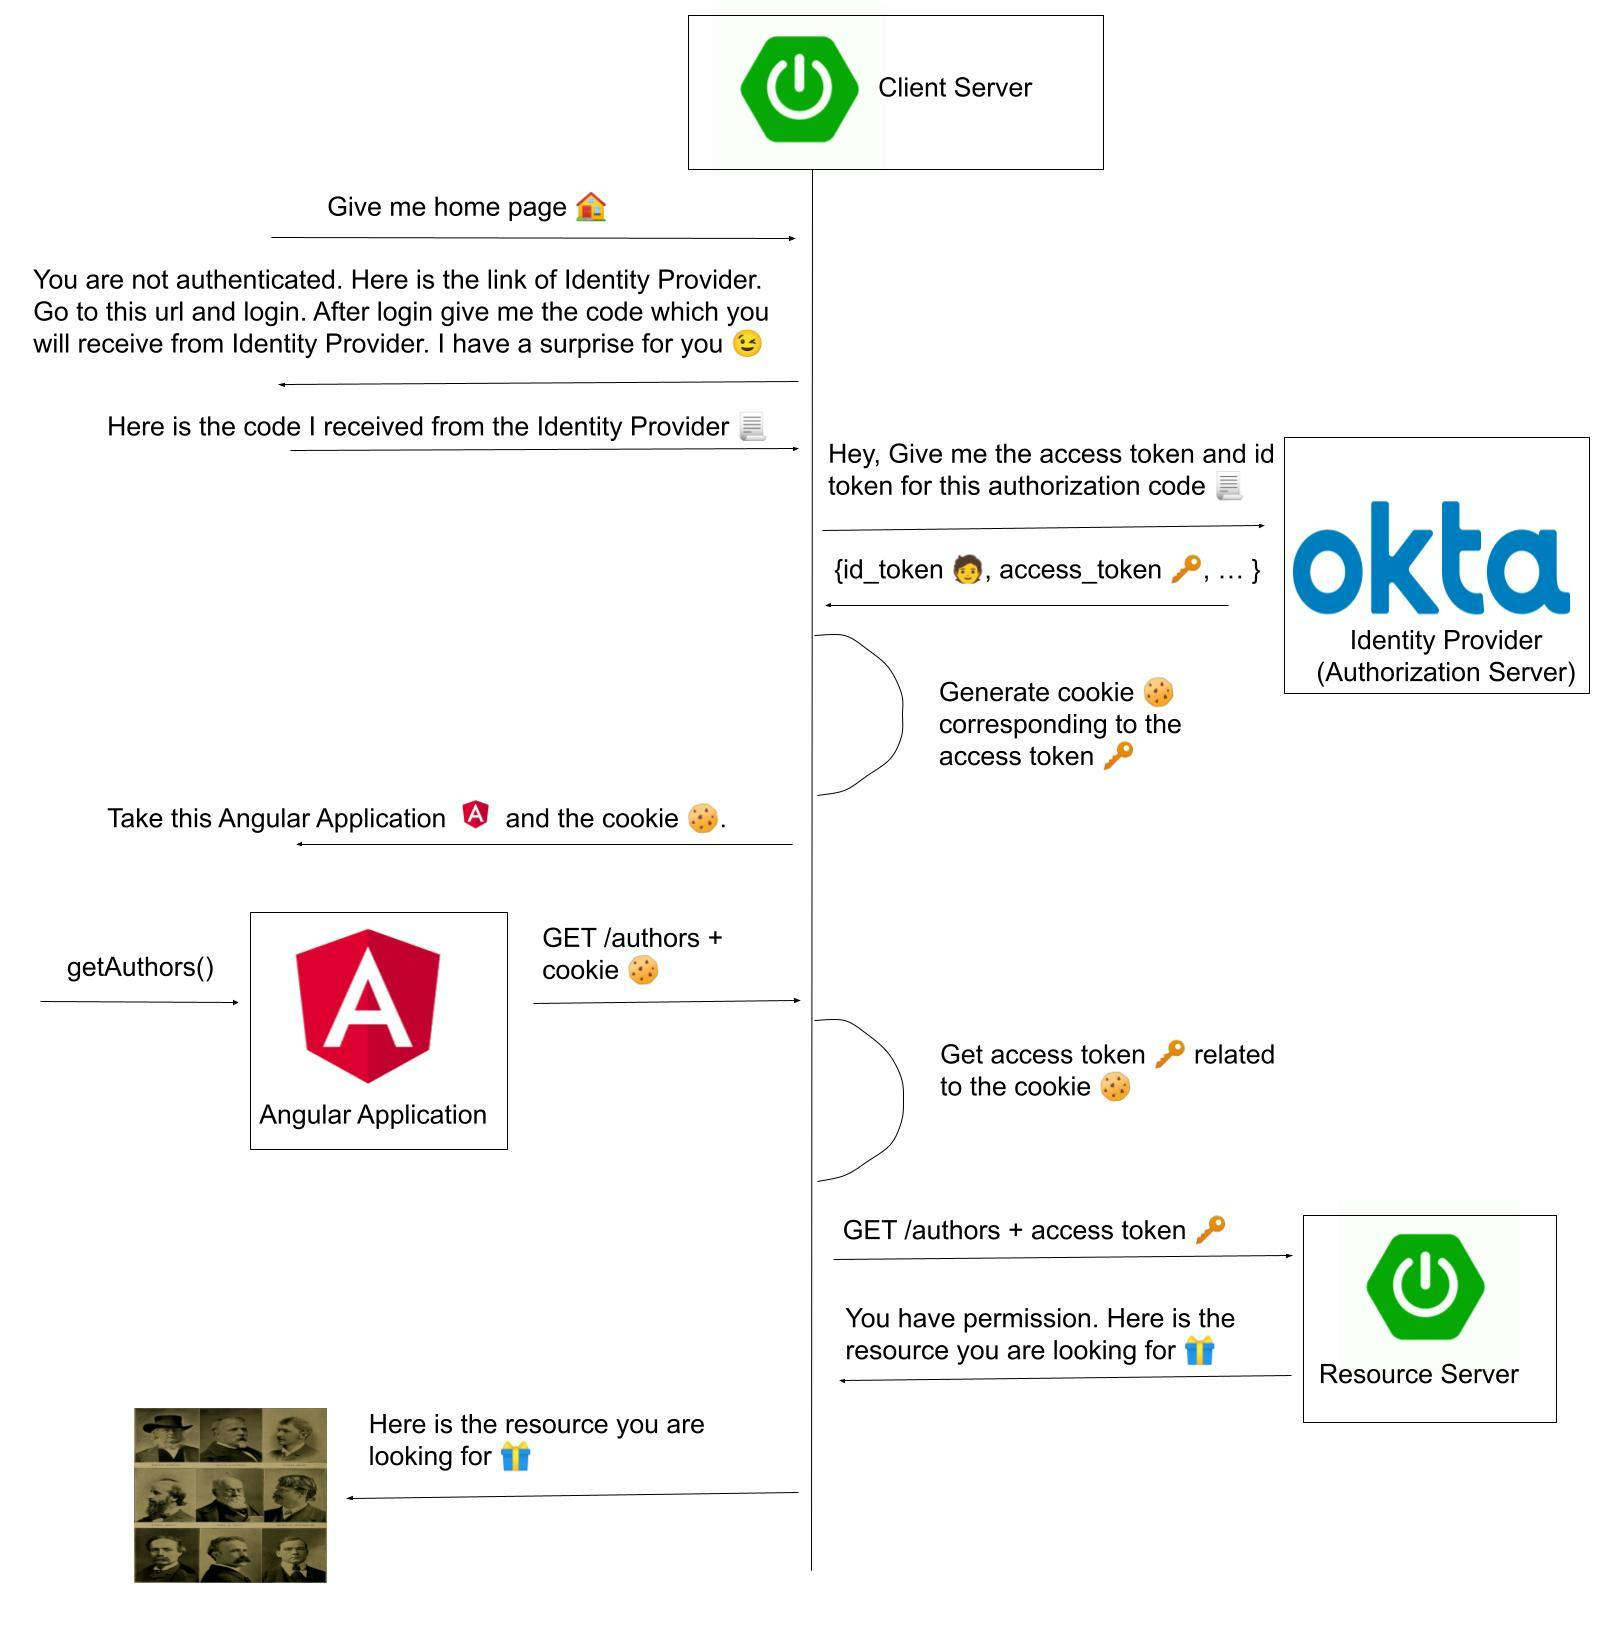
First, let's see what happens when we render an angular application using a client-server. When the user tries to access the app, the client-server redirects her to Identity Provider's website to log in since we made it an OAuth2 client. After successful login, the client-server sends another request to the Identity Provider and gets the access token. Then, the server stores the access token within itself and renders the angular application. It also sends an HttpOnly cookie 🍪corresponding to the access token. Since the cookie is HttpOnly, no script can read it. Thus, it is nearly impossible to steal the cookie.
Now, let's see how to send the access token to the resource server? The idea is to use the client-server as a proxy for each request to the resource server. Whatever request we want to send to the resource server from the angular app, we send it to the client-server itself. Since we got a cookie from the client-server, it is sent along with each request to the same client-server. And then the client-server will pick the access token corresponding to the cookie which is received from the angular app. Then, the client-server sends the request to the resource server with the access token. Below image shows the flow:
Authenticated User 🧑
First, let's try to fetch the details of the currently authenticated user. We will create a controller in the client-server and will try to send a request to that endpoint from the angular app.
Changes in Client Server
We can use AuthenticationPrincipal from spring. AuthenticationPrincipal annotation is used to get the currently authenticated user in spring. Create a new package called user inside the default package of the client-server. Then, create a Java class called UserController.java inside the user package. Replace the content of the UserController.java file with the following code:
package dev.hashnode.hpareek.oauth2clientserver.user;

import java.util.HashMap;
import java.util.Map;

import org.springframework.security.core.annotation.AuthenticationPrincipal;
import org.springframework.security.oauth2.core.user.OAuth2User;
import org.springframework.web.bind.annotation.GetMapping;
import org.springframework.web.bind.annotation.RequestMapping;
import org.springframework.web.bind.annotation.RestController;

@RestController
@RequestMapping("/users")
public class UserController {

    @GetMapping("/self")
    public Map<String, String> getAuthenticatedUser(
        @AuthenticationPrincipal OAuth2User principal
    ) {
        Map<String, String> map = new HashMap<>();
        map.put("name", principal.getAttribute("given_name"));
        map.put("email", principal.getAttribute("email"));
        map.put("id", principal.getName());
        return map;
    }
}
Let's break the above code:
getAuthenticatedUserhandles the requests to the/users/selfendpoint.AuthenticationPrincipalannotation returns the currently authenticated user. Since we are usingOAuth2for authentication, we receive theprincipalof typeOAuth2User.principalhas many attributes in it. We are accessing a few of these.
That's it. Now, whenever an authenticated user sends a request to the /users/self endpoint, the server responds with her name, email, and id. Now, restart the client-server. Now, let's make changes to the angular app.
Changes in the Angular App
To make, API calls in any angular app, we need to import HttpClientModule. Add these 2 lines in the app.modules.ts file:
// ... other imports ...
import { HttpClientModule } from "@angular/common/http";  // 1. Import HttpClientModule
@NgModule({
  ...
  imports: [
    ...
    HttpClientModule,  // 2. Add HttpClientModule to imports array
    ...
  ],
  ...
})
...
Replace the content of the app.component.ts file with the following code:
import { HttpClient } from '@angular/common/http';
import { Component, OnInit } from '@angular/core';

@Component({
  selector: 'app-root',
  templateUrl: './app.component.html',
  styleUrls: ['./app.component.css']
})
export class AppComponent implements OnInit {
  title = 'My Angular App';
  authenticatedUser : {email: string, name: string, id: string} | undefined;

  constructor(private _httpClient: HttpClient) {}

  ngOnInit(): void {
    this.getUsername();
  }

  getUsername() {
    this._httpClient.get("/users/self").subscribe(response => {
      this.authenticatedUser = response as {email: string, name: string, id: string};
    });
  }
}
ngOnInit method runs on initialization of the component. getUsername method sends a request to the /users/self endpoint and assigns the response to authenticatedUser variable. If you notice, we are not specifying any domain to make an API call. Since we are serving the angular app from the client-server, the domain of the angular app is the same as the client-server. So, we don't need to specify the domain for requests to the client-server. Now, let's change the contents of the app.component.html file to display the user information:
<h3>{{title}}</h3>
<div *ngIf="authenticatedUser">
  Email - {{authenticatedUser.email}} <br />
  Name - {{authenticatedUser.name}} <br />
  Id - {{authenticatedUser.id}} <br />
</div>
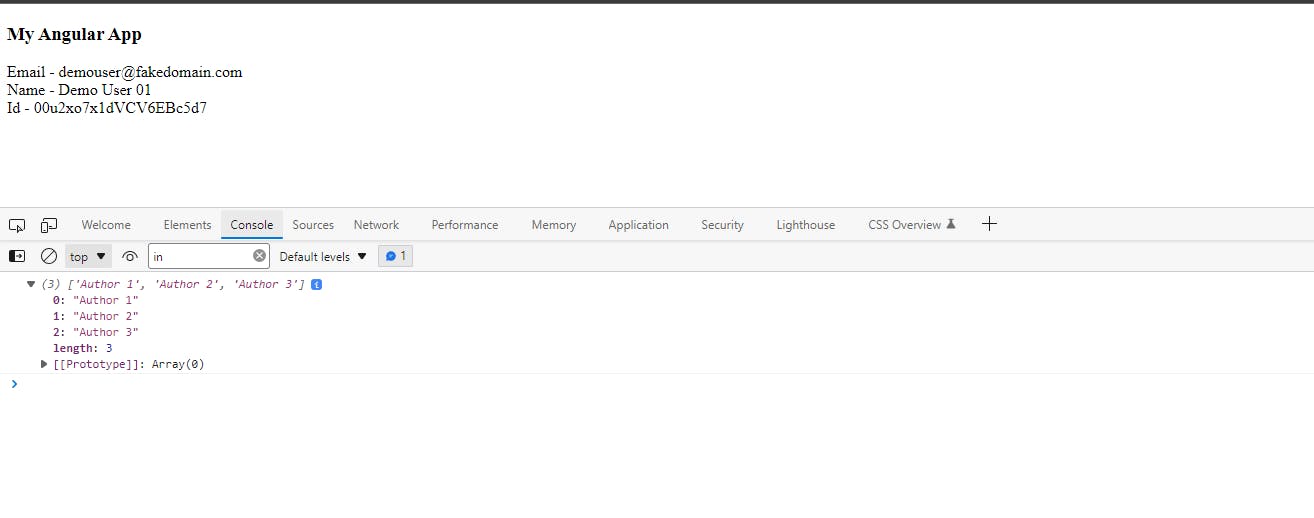
Now, since the ./ng build --watch command is running. After saving the above 3 files, the angular app is built automatically. Visit http://localhost:8081 in any private browser window. After successful login, we see a page with the following content:

Making API calls to the Resource Server
Our resource server already exposes an API endpoint /authors/all, which returns a list of 3 authors. This endpoint needs the incoming request to be authenticated. The request must have an access token with the authors scope. This is accomplished by @PreAuthorize("hasAuthority('SCOPE_authors')") annotation on method getAuthors() in the file controllers/AuthorController.java of the resource server. We can not make the request straight to the resource server from the angular app since the app does not know about the access token. So, the angular app sends requests to the client-server (cookie 🍪 is automatically included), and the client-server sends the request to the resource-server with the access token 🔑. Since the access token must have authors scope in it, add that in the scop list for the client-server. Modify the application.properties file of the client-server as shown below.
spring.security.oauth2.client.registration.okta.scope=openid,profile,email (Remove this)
spring.security.oauth2.client.registration.okta.scope=openid,profile,email,authors (Add this)
Now, whenever the user login to the app, she is asked to grant access to the authors scope.
WebClient is used to make rest requests from a Spring Boot Server. But, we need to configure the WebClient to include the access token while making API requests to the resource server.
Configuring WebClient on Client-Server 🌐
To use WebClient, add spring-boot-starter-webflux dependency under dependencies section of the client-server.
<dependencies>
        ...
        <dependency>
            <groupId>org.springframework.boot</groupId>
            <artifactId>spring-boot-starter-webflux</artifactId>
        </dependency>
        ...
</dependencies>
Create a package security inside the default package for the client-server. Create a java class SecurityConfiguration.java inside the security package and replace the code of the file with the following code:
package dev.hashnode.hpareek.oauth2clientserver.security;

import org.springframework.context.annotation.Bean;
import org.springframework.context.annotation.Configuration;
import org.springframework.security.oauth2.client.OAuth2AuthorizedClientManager;
import org.springframework.security.oauth2.client.OAuth2AuthorizedClientProvider;
import org.springframework.security.oauth2.client.OAuth2AuthorizedClientProviderBuilder;
import org.springframework.security.oauth2.client.registration.ClientRegistrationRepository;
import org.springframework.security.oauth2.client.web.DefaultOAuth2AuthorizedClientManager;
import org.springframework.security.oauth2.client.web.OAuth2AuthorizedClientRepository;
import org.springframework.security.oauth2.client.web.reactive.function.client.ServletOAuth2AuthorizedClientExchangeFilterFunction;
import org.springframework.web.reactive.function.client.WebClient;

@Configuration
public class SecurityConfiguration {

    @Bean
    public OAuth2AuthorizedClientManager authorizedClientManager (
        ClientRegistrationRepository clientRegistrationRepository,
        OAuth2AuthorizedClientRepository oAuth2AuthorizedClientRepository
    ) {
        OAuth2AuthorizedClientProvider authorizedClientProvider =
            OAuth2AuthorizedClientProviderBuilder.builder()
                .clientCredentials()
                .build();

        DefaultOAuth2AuthorizedClientManager authorizedClientManager =
            new DefaultOAuth2AuthorizedClientManager(
                clientRegistrationRepository,
                oAuth2AuthorizedClientRepository
            );
        authorizedClientManager.setAuthorizedClientProvider(authorizedClientProvider);
        return authorizedClientManager;
    }

    @Bean
    WebClient webClient(OAuth2AuthorizedClientManager authorizedClientManager) {
        ServletOAuth2AuthorizedClientExchangeFilterFunction oAuth2Client =
            new ServletOAuth2AuthorizedClientExchangeFilterFunction(authorizedClientManager);
        oAuth2Client.setDefaultClientRegistrationId("keycloak");
        return WebClient.builder()
            .apply(oAuth2Client.oauth2Configuration())
            .build();
    }
}
In the above code, we configure an instance of WebClient such that it will send access_token🔑 with each request. That's how the resource server gets to know about the user who is sending the requests. In the next step, we use this Bean of WebClient using Autowired annotation.
Make Request from Client-Server to Resource Server
Create another package author for the client-server. Create a file AuthorController.java inside the author package and replace the content of the file with the following code:
package dev.hashnode.hpareek.oauth2clientserver.author;

import org.springframework.beans.factory.annotation.Autowired;
import org.springframework.http.MediaType;
import org.springframework.web.bind.annotation.GetMapping;
import org.springframework.web.bind.annotation.RequestMapping;
import org.springframework.web.bind.annotation.RestController;
import org.springframework.web.reactive.function.client.WebClient;

import reactor.core.publisher.Mono;

@RestController
@RequestMapping("/authors")
public class AuthorController {

    @Autowired
    private WebClient webClient;

    @GetMapping("/all")
    public Mono<Object> all() throws Throwable {
        return webClient.get()
                .uri("http://localhost:8080/authors/all")
                .accept(MediaType.APPLICATION_JSON)
                .retrieve()
                .bodyToMono(Object.class);
    }
}
Above class AuthorController uses Autowired annotation for WebClient. So, it uses the WebClient which we configured in the previous step because we want to send the access token to the resource server.
Make a request from Angular App to Client-Server
Create a new method getAuthors inside app.component.ts, which sends an API request to the /authors/all endpoint and prints the result to the console. Also, in ngOnInit method call the getAuthors method as well along with getUsername method.
...
export class AppComponent implements OnInit {
  ...

  ngOnInit(): void {
    this.getUsername();
    this.getAuthors();
  }
  ...

  getAuthors() {
    this._httpClient.get("/authors/all").subscribe(response => {
      console.log(response);
    });
  }
}
Since ./ng build --watch command is running, the changes in the above files are picked up by Angular CLI automatically and the angular app is built again.
See it in Action 🚀
Now, visit localhost:8081 in a private window. And after successful login, you are presented with a screen to allow the app to use authors scope. Click on Allow Button. We can see the details of the user on the screen same as before. Open the Console tab and we can see the response from the server printed as below:
Summary
Source code for the tutorial can be found here 💻. In this article, we sent requests from the angular app to the client-server with the cookie 🍪. That's how the client-server recognizes the user of the app. Then it generates the corresponding access token. We configured the WebClient in the client-server to send the access token 🔑 with each API request. And then we sent the request from the client-server to the resource server. That's the overall flow of the requests from the angular app to the resource server. This article is probably the last of the series. But, you never know 😉. Please, consider giving your feedback. Also, you can recommend me on topic for my next article in the comment section. Until then, stay safe 😷 and keep learning.